Introduction
Soldering is the backbone of electronics manufacturing and repair. Whether you’re assembling a DIY project, prototyping a new device, or troubleshooting a faulty printed circuit board (PCB), mastering soldering techniques is essential. This guide explores the fundamentals of soldering circuit boards, from tools and materials to advanced troubleshooting tips. By the end, you’ll gain actionable knowledge to achieve clean, reliable solder joints every time.
2. Soldering Circuit Boards: Core Principles
What Makes Soldering Circuit Boards Unique?
Unlike general soldering, soldering circuit boards demands precision to avoid damaging delicate components or thin copper traces.
Material Compatibility in Soldering Circuit Boards
- PCB Substrates: FR-4, ceramic, or flexible materials require tailored heat settings.
- Component Sensitivity: ICs, resistors, and capacitors vary in thermal tolerance.
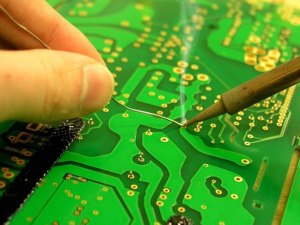
Soldering Circuit Boards
3. Essential Tools for Soldering Circuit Boards
Soldering Irons and Stations
- Temperature-controlled irons (e.g., 30–60W) are critical for soldering circuit boards without overheating.
Specialized Tools for Advanced Soldering Circuit Boards
- Microscopes: For inspecting SMD joints.
- Hot Air Rework Stations: For reflowing BGA components.
2. Essential Soldering Tools
Must-Have Equipment
- Soldering Iron: Choose adjustable-temperature models (30–60W) for precision.
- Soldering Station: Provides stable heat control and safety features.
- Solder Wire: 0.5–1.0mm diameter for most PCB work.
- Tip Cleaner: Brass wool or sponge to maintain tip cleanliness.
- Tweezers: For handling small components.
- Desoldering Tools: Solder wick, vacuum pumps, or desoldering stations.
Optional but Helpful Tools
- Magnifying Lamp: For inspecting tiny joints.
- Third Hand Tool: Holds PCBs steady during soldering.
- ESD-Safe Mat: Protects static-sensitive components.
3. Step-by-Step Soldering Process
Step 1: Preparation
- Clean the PCB: Remove dust or oxidation with isopropyl alcohol.
- Component Placement: Insert through-hole components and bend leads slightly to hold them in place.
Step 2: Tinning the Iron
- Heat the iron to 300–350°C (lead-free: 350–400°C).
- Apply a small amount of solder to the tip to improve heat transfer.
Step 3: Soldering a Joint
- Heat Both Surfaces: Touch the iron to the component lead and PCB pad simultaneously.
- Apply Solder: Feed solder into the joint—not directly onto the iron—until it flows smoothly.
- Remove and Inspect: Withdraw the iron and check for a shiny, concave fillet.
Step 4: Post-Soldering
- Trim Excess Leads: Use flush cutters to remove protruding wires.
- Clean Flux Residue: Use a brush and alcohol if necessary.
4. Step-by-Step Process for Soldering Circuit Boards
Preparing the PCB for Soldering
- Clean pads with isopropyl alcohol to ensure adhesion.
- Secure components with tape or holders.
Executing Flawless Joints on Circuit Boards
- Balance heat application to avoid lifted pads or cold joints.
5. Common Defects in Soldering Circuit Boards
Cold Joints and Solder Bridges
- Causes: Poor technique or incorrect temperature.
- Impact: Circuit failure or shorting.
Lifted Pads: A Critical Issue in Soldering Circuit Boards
- Prevention: Use low-wattage irons and avoid excessive force.
6. Advanced Techniques for Soldering Circuit Boards
Soldering Circuit Boards with SMD Components
- 0201/01005 Packages: Use magnification and fine-tip irons.
High-Density Soldering Circuit Boards
- Multi-Layer PCBs: Manage heat to prevent delamination.
7. Soldering Circuit Boards in Repairs and Rework
Desoldering Components Without Damage
- Tools: Solder wick, vacuum pumps.
- Techniques: Apply flux to ease solder removal.
Repairing Damaged Traces on Circuit Boards
- Copper Tape vs. Jumper Wires: Choose based on trace width.
8. Environmental Factors in Soldering Circuit Boards
Humidity and Oxidation Risks
- Store PCBs in moisture-controlled environments.
Eco-Friendly Practices for Soldering Circuit Boards
- Transition to lead-free solder and biodegradable flux.
9. Industrial Soldering Circuit Boards: Automation
Wave Soldering for Mass Production
- Ideal for through-hole components on large batches.
Reflow Soldering Circuit Boards with SMDs
- Optimize temperature profiles for defect-free results.
10. Safety Protocols for Soldering Circuit Boards
Fume Extraction and Ventilation
- Protect against rosin and flux fumes.
ESD Protection in Soldering Circuit Boards
- Ground wrist straps and anti-static mats.
11. Soldering Circuit Boards: Hobbyist vs. Professional Standards
DIY Best Practices
- Use affordable tools and practice on scrap boards.
Industrial Quality Control
- Follow IPC-A-610 standards for military/aerospace-grade boards.
12. Case Studies: Soldering Circuit Boards in Action
Medical Device PCB Assembly
- Challenges: Biocompatibility and precision.
Automotive Control Module Repairs
- Solutions: Vibration-resistant solder alloys.
13. Soldering Different Component Types
Not all components are created equal. Understanding how to handle various parts ensures reliability and avoids damage.
Through-Hole Components
- Resistors, Capacitors, and Diodes:
- Insert the component leads into the PCB holes.
- Bend the leads slightly outward to hold the part in place.
- Solder the joint using the “heat both surfaces” method.
- ICs and Headers:
- Use a socket for sensitive ICs to avoid heat damage.
- For multi-pin headers, solder diagonal pins first to ensure alignment.
Surface-Mount Devices (SMDs)
- Passive Components (Resistors, Capacitors):
- Apply solder paste to one pad.
- Place the component with tweezers.
- Reflow the solder with a hot air gun or fine-tip iron.
- QFP and SOIC Packages:
- Tack-solder one corner pin to fix the component.
- Use a drag-soldering technique with flux to solder remaining pins.
- 0201 and 01005 Micro-Components:
- Work under magnification.
- Use low-temperature solder paste to prevent thermal shock.
High-Power Components
- MOSFETs, Voltage Regulators, and Heat Sinks:
- Use high-temperature solder (e.g., Sn-Ag-Cu).
- Ensure proper thermal relief in PCB design to avoid pad lifting.
- Secure heat sinks with thermal adhesive before soldering.
14. Common Soldering Defects & Fixes
Cold Solder Joints
- Symptoms: Dull, cracked, or lumpy appearance.
- Causes: Insufficient heat or movement during cooling.
- Fix: Reheat the joint and add fresh solder.
Solder Bridges
- Symptoms: Unintended connections between adjacent pads.
- Causes: Excess solder or misaligned components.
- Fix: Use solder wick or a desoldering pump to remove excess.
Lifted Pads
- Symptoms: Copper pad detaches from the PCB.
- Causes: Overheating or mechanical stress.
- Fix: Repair with conductive epoxy or jumper wires.
15. Advanced Techniques
Surface-Mount Soldering (SMD)
- Tools Required: Fine-tip iron, tweezers, and magnification.
- Process:
- Apply flux to the PCB pads.
- Place the component with tweezers.
- Solder one pad to secure the part, then solder remaining pins.
Soldering Multi-Layer Boards
High-density PCBs require precision to avoid damaging inner layers:
- Use temperature-controlled irons.
- Limit dwell time to prevent delamination.
Reworking BGA Components
Ball Grid Array (BGA) chips demand specialized tools like hot air rework stations and stencils for solder ball alignment.
16. Safety & Best Practices
- Ventilation: Avoid inhaling flux fumes with a fume extractor.
- ESD Protection: Use grounded wrist straps when handling sensitive ICs.
- Tip Maintenance: Regularly clean and tin tips to extend lifespan.
17. Industry Trends & Innovations
- Automated Soldering: Robotic systems for high-volume production.
- Low-Temperature Solder Alloys: Reduce thermal stress on components.
- 3D Solder Paste Printing: Enhances precision for miniaturized designs.
18. Soldering Automation and Mass Production
For industrial applications, manual soldering is impractical. Modern techniques include:
Wave Soldering
- Process: PCBs pass over a molten solder wave, soldering all through-hole components at once.
- Best For: High-volume through-hole assemblies.
- Challenges: Shadowing (components blocking solder flow) requires careful board design.
Reflow Soldering
- Solder Paste Application: Stencil-print paste onto PCB pads.
- Component Placement: Pick-and-place machines position SMDs.
- Reflow Oven: Heats the board to melt solder paste, forming permanent joints.
- Temperature Profile: Critical for avoiding defects:
- Preheat (150–180°C): Activates flux.
- Soak (180–220°C): Evaporates solvents.
- Reflow (220–250°C): Solder melts and wets surfaces.
- Cooling: Solidifies joints without cracks.
Selective Soldering
- Combines wave and reflow techniques for mixed-technology boards.
- Ideal for soldering connectors or heat-sensitive parts after SMD reflow.
19. Troubleshooting Complex Soldering Issues
Intermittent Connections
- Causes: Micro-cracks from vibration or thermal cycling.
- Diagnosis: Use a multimeter in continuity mode while flexing the board.
- Fix: Reflow affected joints or reinforce with conductive epoxy.
Whisker Growth
- What is it? Metallic filaments (tin whiskers) causing short circuits.
- Prevention: Use matte-finish solder or conformal coating.
Black Pad Syndrome
- Occurs in ENIG-finished PCBs: Nickel layer corrodes, causing brittle joints.
- Solution: Replace ENIG with immersion silver or OSP finishes.
20. Soldering for Hobbyists vs. Professionals
Hobbyist Tips
- Budget Tools: Entry-level soldering stations (e.g., Hakko FX-888D) suffice for most projects.
- Recycling Components: Desolder parts from old electronics for practice.
- Community Resources: Online forums and YouTube tutorials for skill-building.
Professional Standards
- IPC Certification: Follow IPC-A-610 (Acceptability of Electronic Assemblies) guidelines.
- Documentation: Maintain records of solder profiles, flux types, and rework steps.
- Quality Control: Use X-ray inspection for BGA joints and AOI (Automated Optical Inspection) for SMDs.
21. Case Studies: Real-World Soldering Challenges
Case 1: Medical Device PCB
- Challenge: Soldering biocompatible sensors without introducing contaminants.
- Solution:
- Use no-clean flux to minimize residue.
- Employ nitrogen-assisted soldering to reduce oxidation.
- Post-assembly cleaning with ultrasonic baths.
Case 2: Automotive Control Module
- Challenge: Vibration-resistant joints for under-hood environments.
- Solution:
- Use Sn-Ag-Cu solder for high mechanical strength.
- Reinforce critical joints with silicone adhesive.
- Implement strain relief for wiring harnesses.
Case 3: Consumer Electronics Repair
- Challenge: Removing a BGA chip without damaging the PCB.
- Solution:
- Preheat the board to 150°C.
- Use a hot air rework station with a nozzle matching the BGA size.
- Lift the chip once solder balls liquefy (monitored via thermal camera).
22. Future of Soldering Technology
Nano-Soldering
- Applications: Microelectronics and flexible circuits.
- Technique: Laser-assisted soldering for sub-10µm joints.
Sustainable Practices
- Biodegradable Fluxes: Reduce environmental impact.
- Solder Recycling: Reclaim precious metals from discarded PCBs.
AI-Driven Soldering Systems
- Machine learning algorithms optimize temperature profiles and detect defects in real-time.
Conclusion
Soldering circuit boards is equal parts science and art. With the right tools, techniques, and attention to detail, even beginners can achieve professional-grade results. As technology evolves, staying updated on industry trends—such as lead-free soldering and SMD advancements—will keep your skills sharp. For further reading, explore resources like ipcb.com’s soldering guide, which dives deeper into PCB-specific challenges.
By mastering these principles, you’ll not only improve your soldering efficiency but also extend the lifespan and reliability of your electronic projects.

- long board pcb
- Flexible PCBs
- Special PCB
- Express Printed Circuit Board
- Pcb Prototype
- LED PCB
- PCB
- Printed Circuit Board
- Pcb meaning
- Pcb manufacturer
- Rigid pcb board
- Rigid Flex PCB
 Quote
Quote
 E-mail